 With iPhoto ’09 out for less than a week, I thought I’d write a post with Tips and Tricks for it that I have discovered while playing with this great piece of software. This will *hopefully* be the first installment of the iPhoto ’09 Tips and Tricks posts, and focuses on the new Faces feature.
I can honestly say that I’ve been pretty excited about iPhoto since I got iLife ’09 last Tuesday. However, there are a few caveats to this useful iPhoto update:
- Faces is not a replacement for manual photo tagging. As far as I can tell, Faces is basically “next best” solution to not tagging your photos at all – since it’s automated and does not require as much overhead as manually tagging your photos. This is a somewhat sad realization for the 3 of us out there who have tagged almost all of our 20,000+ photo library already, but that’s alright.
- Keyword Manager, my beloved iPhoto companion, is not yet compatible with iPhoto ’09 as of this writing. The guys behind Keyword Manager have ordered a copy of iLife ’09, and we’re all patiently waiting for them to either issue an update (yay!) or tell us that they’re throwing in the towel (sadness!). From my experience with iPhoto so far, I think that Keyword Manager isn’t going anywhere.
As I find more tips, I’ll add them here, so be sure and check back.
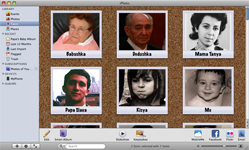
 When working in Faces mode, it helps to click on the 2nd button from the left on the bottom toolbar (looks like a silhouette portrait, see picture on the right). This button will isolate the faces in question in the photo and make it easier to confirm who iPhoto is actually asking about.
- When in the Faces section, looking at a particular person’s “confirmed” as well as suggested photos, you can easily confirm a suggested photo by dragging it into the “confirmed” section at the top of the window. This can save you the hassle of clicking the Name button and then confirming manually.
- When tagging someone’s face for the first time, pick a photo where their face is clearly visible (and ideally without sun glasses). Sun glasses really play with iPhoto’s facial recognition system, and picking a good first photo can make iPhoto’s initial face recommendations much better.
- When confirming faces manually, you can confirm multiple photos at once by simply clicking and dragging a box around the photos in question. Making the same box around the photos while holding the Option key will reject all of the photos in the box, instead of confirming (see screenshot below).
 In addition to Tip 3 (and in the Portrait mode – Tip 1), I highly suggest that, while confirming faces, you make the iPhoto window large enough (and thumbnails small enough) to show 5 to 6 photos across. That way, you can quickly confirm or reject many photos at once (see screenshot on the right).
- I found that it was helpful to quickly browse the photos it is suggesting in the current window, and then deciding if the vast majority of them are indeed the person whose face you’re tagging. If the majority are the right person, then confirm them all using the box method described in Tip 3 and reject the individual “rejects” by either double clicking on those photos, or clicking on them while holding option. If the majority are not, follow Tip 3 again, making the box while holding down they Option key. Then you can confirm the individual photos with the correct faces by either clicking on them individually. This GREATLY speeds up face tagging (see picture on the right).
- When iPhoto did not or cannot recognize the presence of a face (happens more than I’d hope), you can manually add a face. However, the box it creates when you click on “Add Missing Face” is rarely the right size. This box also has a seemingly unintuitive way of resizing. When you click on a corner and contract or expand the box, both sides of the box expand (hard to explain, but you’ll see what I’m talking about). Therefore, when manually adding faces, I suggest you first move the box so that it’s center is in the exact center of the face you’re tagging. Then resize the box. You’ll find that doing it this way will be much much easier since you won’t have to move the box (and resize) around (and resize) as much.
Like I said, I will be adding more tips and tricks (especially about the new Places feature) as I come across them, so check back. In the mean time, you can also find more tips and tricks from Gizmodo and MacLife.
 As time goes on, I don’t think I’m alone in feeling that we shouldn’t have to be forced to watch television on someone else’s schedule. That’s why I’m always on the lookout for new ways to watch my favorite tv shows whenever I want. Sure, there is on demand from your friendly local cable company, but that has neither every episode nor every show. So what to do?


 Last Monday, I received a phone call from Microsoft’s Mac division, asking if I would like to help them improve Microsoft Office for Mac. My first instinct was to ask them how they’d found me. As it turned out, Microsoft and their henchmen keep their ears to the proverbial (online) street, and had recently encountered my website and found it filled with the sort of feedback and recommendations that they thought would serve their purpose. Since this isn’t exactly a tip or trick, click the link below to read about my visit.