Delete Unwanted Mp3s Not in Your iTunes Library

February 12th, 2009

itunesdelete.png
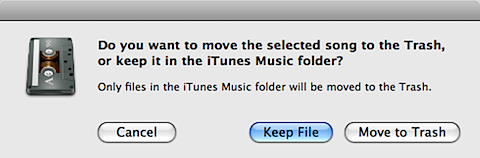
I listen to a lot of new music every week, and as a result, I end up deleting a lot of music after listening to it once or twice. The problem I’ve run into is that when I’m trying to delete a song from my music library, iTunes, as a precaution, gives me the dialogue box on the right.

Now this isn’t a problem in and of itself, but for some reason, I tend to simply press return when I see this box, instead of pressing the “Move to Trash” button. Pressing return selects the “Keep File” button, which means that somewhere in my iTunes folder, I’ll have an mp3 laying around which I a) don’t want and b) forget about. This might not seem like a big deal, but as it turned out, I have over 1.5GB of these kinds of files, just wasting space on my MacBook Pro.

Today I realized that I must not be the only one with this problem, and so a routine Google search revealed that there was indeed a simple solution. There is an AppleScript called List Music Folder Files Not Added that will search a specified folder (in my case my iTunes Music folder) for any files which are not in your iTunes Music Library.

Two important notes before we go on:

  • If you, for any reason, think you removed songs/videos/podcasts/etc from iTunes but intentionally clicked Keep File in the dialogue box above, do NOT follow these instructions because your media will be erased.
  • This tip will only work if you have the following checkboxes checked in your iTunes Preferences–> Advanced: ‘Keep iTunes Music folder organized’ and ‘Copy files to iTunes Music folder when adding to library.’ I highly recommend both of these settings be enabled anyway, especially since you can simply consolidate your library.

Here’s all you have to do:

  1. Download the List Music Folder Files Not Added script from Doug’s AppleScripts for iTunes (a very useful site).
  2. Double click on the DMG to mount it and then copy the “CocoaCallBridge” and “List Music Folder Files Not Added” files to the following folder: [your username]/Library/iTunes/Scripts. I you don’t have a Scripts folder in iTunes, just create one.
  3. Open iTunes and you should see a little black script icon in the menubar next to Window. Click on it and select the List Music Folder Files Not Added script.
  4. It will open the AppleScript and ask you which folder you want to compare to your iTunes Music Library. For my problem, I selected all of the folders (cmd+a) within /Users/[your username]/Music/iTunes/iTunes Music. Then press return.
  5. It then gives you another dialogue box which asks where you want to save the exported file. I simply chose my Desktop so that it would be easy to find. Be sure to fill in the box where it says “Save As:” with a filename that ends in m3u. This will create a playlist of all of the songs you removed from the iTunes library but didnt delete. Press return and let it do its work (might take a while depending on the size of your library). If you’re running Leopard it might warn you about running the CocoaCallBridge application – just say yes and let it do its work – its part of the AppleScript).
  6. When the AppleScript tells you that it finished, go to iTunes and create a new playlist. Then drag the m3u file that the AppleScript created into that playlist.
  7. Now in one swoop, select all of the songs in that playlist (cmd+a), and press cmd+option+delete. It will now give you that dialogue box you see at the top of this post. BE SURE TO CLICK MOVE TO TRASH (if you press return, you’re gonna have to repeat step 6 again). Now the unwanted mp3s are in your trash. Before emptying your trash, take a look just in case at what you just erased one last time.

That’s all you have to do! It’s a great little script and it saved me over 1.5GB on my hard drive! If you have any questions, leave me a comment and I’ll clarify anything you need. Enjoy.

iPhoto ’09: Tips and Tricks [Faces Edition]

February 1st, 2009

iphoto.png
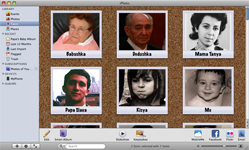
With iPhoto ’09 out for less than a week, I thought I’d write a post with Tips and Tricks for it that I have discovered while playing with this great piece of software. This will *hopefully* be the first installment of the iPhoto ’09 Tips and Tricks posts, and focuses on the new Faces feature.  

I can honestly say that I’ve been pretty excited about iPhoto since I got iLife ’09 last Tuesday. However, there are a few caveats to this useful iPhoto update:

  1. Faces is not a replacement for manual photo tagging. As far as I can tell, Faces is basically “next best” solution to not tagging your photos at all – since it’s automated and does not require as much overhead as manually tagging your photos. This is a somewhat sad realization for the 3 of us out there who have tagged almost all of our 20,000+ photo library already, but that’s alright.
  2. Keyword Manager, my beloved iPhoto companion, is not yet compatible with iPhoto ’09 as of this writing. The guys behind Keyword Manager have ordered a copy of iLife ’09, and we’re all patiently waiting for them to either issue an update (yay!) or tell us that they’re throwing in the towel (sadness!). From my experience with iPhoto so far, I think that Keyword Manager isn’t going anywhere.

As I find more tips, I’ll add them here, so be sure and check back.

  1. portrait.pngWhen working in Faces mode, it helps to click on the 2nd button from the left on the bottom toolbar (looks like a silhouette portrait, see picture on the right). This button will isolate the faces in question in the photo and make it easier to confirm who iPhoto is actually asking about.
  2. When in the Faces section, looking at a particular person’s “confirmed” as well as suggested photos, you can easily confirm a suggested photo by dragging it into the “confirmed” section at the top of the window. This can save you the hassle of clicking the Name button and then confirming manually.
  3. When tagging someone’s face for the first time, pick a photo where their face is clearly visible (and ideally without sun glasses). Sun glasses really play with iPhoto’s facial recognition system, and picking a good first photo can make iPhoto’s initial face recommendations much better.
  4. When confirming faces manually, you can confirm multiple photos at once by simply clicking and dragging a box around the photos in question. Making the same box around the photos while holding the Option key will reject all of the photos in the box, instead of confirming (see screenshot below).
  5. columns.jpgIn addition to Tip 3 (and in the Portrait mode – Tip 1), I highly suggest that, while confirming faces, you make the iPhoto window large enough (and thumbnails small enough) to show 5 to 6 photos across. That way, you can quickly confirm or reject many photos at once (see screenshot on the right).
  6. I found that it was helpful to quickly browse the photos it is suggesting in the current window, and then deciding if the vast majority of them are indeed the person whose face you’re tagging. If the majority are the right person, then confirm them all using the box method described in Tip 3 and reject the individual “rejects” by either double clicking on those photos, or clicking on them while holding option. If the majority are not, follow Tip 3 again, making the box while holding down they Option key. Then you can confirm the individual photos with the correct faces by either clicking on them individually. This GREATLY speeds up face tagging (see picture on the right).
  7. When iPhoto did not or cannot recognize the presence of a face (happens more than I’d hope), you can manually add a face. However, the box it creates when you click on “Add Missing Face” is rarely the right size. This box also has a seemingly unintuitive way of resizing. When you click on a corner and contract or expand the box, both sides of the box expand (hard to explain, but you’ll see what I’m talking about). Therefore, when manually adding faces, I suggest you first move the box so that it’s center is in the exact center of the face you’re tagging. Then resize the box. You’ll find that doing it this way will be much much easier since you won’t have to move the box (and resize) around (and resize) as much.

Like I said, I will be adding more tips and tricks (especially about the new Places feature) as I come across them, so check back. In the mean time, you can also find more tips and tricks from Gizmodo and MacLife.

The Real TV On Demand

October 26th, 2008

demand.png As time goes on, I don’t think I’m alone in feeling that we shouldn’t have to be forced to watch television on someone else’s schedule. That’s why I’m always on the lookout for new ways to watch my favorite tv shows whenever I want. Sure, there is on demand from your friendly local cable company, but that has neither every episode nor every show. So what to do?

There are three websites that I’d like to recommend which let you watch your TV shows online, without ever having to download any of them:

Surf the Channel

Probably the most comprehensive collection of links to streamable tv episodes out there. I just found this site, and I have to say, I’m impressed. They even have every episode of The West Wing online, often with multiple backup sites for each episode. Wow.

All UC

This site has been around for quite a while now, but it’s still quite great. If Surf the Channel doesn’t have your show, then AllUC probably does. Be sure to check it out.

Hulu

Hulu is the ‘legitimate’ one of the bunch, but also provides high quality streaming of lots of different tv shows. It was founded as a joint venture between NBC entertainment and NewsCorp. It’s well done, and quite useful so check it out.

With bandwidth and space costs decreasing, it’s nice to see an alternative to downloading tv shows or watching them at their regularly scheduled time.

If anyone has any other suggestions for streaming tv show sites, let me know! Its time for me to get back to watching the Mad Men season finale!

Simpler Bills and Picasa Photos

July 9th, 2008

Two seemingly unrelated things, unless you’re still getting your photos developed at your friendly local photo place. Well, for the purposes of this post, they are simply two very helpful but unrelated tips. Here goes:

Split Bills Simpler

shorter.png

Have you ever gone on a trip with a group of friends, and painstakingly collected all of your receipts only to find out that now you have to fire up Excel and figure out who owes what to whom? I have. In fact, if you count our house bills, I have to go through this very process pretty regularly.

Luckily there’s a fantastic little tool out there called Short Reckonings which takes all of the work out of it. All you have to do is open the Short Reckonings page, name your expense sheet, enter the involved people’s names, and then enter the expenses one by one and the people among whom you’d like to split that expense. That’s it.

short.png

Short Reckonings does the rest for you, figuring out how much each person owes, and the most efficient way for each person to pay (so that a minimum of checks are written). It generates a report for you, optimizes for printing, let’s you have non-even splits (weights), and even allows you to export your data to Excel format. You don’t even need to sign up for an account. It saves your expenses and gives you a convenient URL to save or hand out to the participants (check out my Bonnaroo expenses, for example).

It’s a great little tool and the developer, Mikaël Gravé, is extremely helpful and always looking for suggestions and bug reports. There are alternatives to Short Reckonings but none are nearly as well done or as simple. So next time you gotta split up a whole lot of expenses, be sure and try out Short Reckonings.

Easily Download Picasa WebAlbums on a Mac

picasaweb.png

Have you ever received a notification from a friend that he or she has place new photos of your most recent trip on their Picasa Web Albums. If you’re on a mac, you know that its nearly impossible to easily download all of those photos all at once. In fact, the only way I knew how to do this was to run Picasa in Windows through Parallels (which allows you to simply click Download to Picasa and drag the photos back to my Mac that way, ugh).

Luckily, today I found a simpler way thanks to a thread over at Apple’s Discussion Forums. As long as you have iPhoto ’08, you can simply do the following:

  1. Copy the URL of the RSS feed from the PicasaWeb album (it’s at the bottom right hand corner of the thumbnail view)
  2. In iPhoto go to: File –> Subscribe to Photo Feed and paste the URL you just copied.

That’s it. I didn’t even need to number those steps. Iphoto will automatically download the photos to your Mac. Brilliant!

Dictionary Tricks

May 29th, 2008

dictionary.png

I’ve been meaning to post these little Apple dictionary tips and tricks for a while now, but now finally have the time to do it. They come from a few TUAW and Lifehacker posts that I found particularly helpful. Dictionary.app is a built-in dictionary, thesaurus, and wikipedia (in Leopard) application that provides spellcheck and grammar throughout OSX.

Therefore, In most OSX applications, you can highlight a word, right (or two-finger-, ctrl-) click and go to “Look up in Dictionary.” This is very useful when you’re tired of deciphering enigmatic diction.

But, there’s a better way to get to the dictionary. In any native Cocoa application (most OSX apps), just highlight a word and then press CMD+CRTL+D. A little dialogue box opens up with the definition, synonyms, etc. Very cool.

The final little dictionary trick has little to do with the dictionary itself as much as it does with looking up words. If you come across a word (or phrase) in a document, pdf, or anything else that you’d like to Google, simply highlight the word and drag it to the Safari icon in the dock. Safari will the immediately open a new tab with a google search for whatever word or words you dragged.

Simple and effective. Enjoy.

Coverflow for Quicksilver

May 7th, 2008

silverflow.pngJust a quick post today about something I’ve been patiently waiting to be released: Silverflow Interface for Quicksilver.

I’ve written about Quicksilver before, and now that its open-source I still highly recommend it. However, for those looking for a little more dazzle for their Quicksilver interface can download Silverflow, a coverflow-type interface.

Julius Eckert has more than a handful of very good looking QS interfaces, but Silverflow is now in open beta and I recommend those that don’t mind little beta bugs to try it out. Its a beautiful thing.

[Quick note: to install Silverflow, simply double click on the .tgz file that you get from Julius' site, and then double click on the Silverflow.qsplugin that gets extracted. Then, fire up Quicksilver and press cmd+(comma) to see the Quicksilver preferences. In the Preferences section, click on Appearance in the column on the left, and then under Command Interface select Silverflow. All done!]

My Visit To Microsoft

April 29th, 2008

Son-of-Man.pngLast Monday, I received a phone call from Microsoft’s Mac division, asking if I would like to help them improve Microsoft Office for Mac. My first instinct was to ask them how they’d found me. As it turned out, Microsoft and their henchmen keep their ears to the proverbial (online) street, and had recently encountered my website and found it filled with the sort of feedback and recommendations that they thought would serve their purpose. Since this isn’t exactly a tip or trick, click the link below to read about my visit.

Read the rest of this entry »

Highlight and Share

April 28th, 2008

awesomehighlighter.png


Just a quick little gem this morning:

I typically send out links to my friends multiple times a day. Whether they like it or not, the links are coming. Well just last week I thought to myself – “wouldn’t it be great if I could highlight certain passages in the webpages that I send out links for, if only to save my friends time and sanity?”

Luckily, someone over at LifeHacker and DownloadSquad must have been thinking on the same wavelength, because they both posted the next day about Awesome Highlighter. Awesome Highlighter allows you to highlight as many passages as you want on any webpage, and then send the link to someone else, preserving your highlights. It even creates a short URL for your link, making it easier to share with people. This is great little tool and I highly recommend it. If you don’t believe me, take a look at an example. Enjoy!

PS For those looking for a bit more features, such as adding comments and the like, check out Jump Knowledge, which is also a great tool but a little more complicated.

Safari: Links in New Tabs

March 21st, 2008

SafariTabs.pngJust a quick tip for those of you who are Safari users (all you Mac users should be using Safari anyway). Personally, I was always really annoyed that Safari didn’t open links in a new tab, always opting to open them in a new window.

As a result, I found myself using programs like Saft and SafariStand, purely to get my links to open in new tabs instead of new windows. Luckily, thanks to a post on TUAW today, this problem is no more. Even those of you who are Terminal-shy can definitely do this. I promise it won’t hurt (and is well worth it!). Just keep in mind that you need the newest version of Safari (3.1), which you can get via Software Update.

All you have to do is open up Terminal, and paste the following command into it, and press return.

defaults write com.apple.Safari TargetedClicksCreateTabs -bool true


That’s it. From now on, your links will open in new tabs, instead of new windows. To undo this preference, just copy the same command above into terminal, changing the true to false. Enjoy.

Update #1: I found some more really interesting Safari tips via Digg. Be sure and check those out too!

historyflow.pngUpdate #2: In keeping up with my apparent theme of cool Safari tricks, Jon Hicks of Hicks Design pointed out a cool new trick in the leopard version of SafariStand. Its called History Flow. Just as the name implies, it allows you to go through your browsing history with a coverflow-type interface. Very cool for those instances that you remember what a webpage looked like, but not what it was called. Click on the image to the left for a screen shot.

A More Useful Search

February 29th, 2008

Inquisitor3.pngOne of my favorite applications for Safari is Inquisitor. It was this program, along with SafariBlock, that made my transition to Safari from Firefox easiest.

Those of you who have used Firefox will recognize the idea behind Inquisitor. And those that have used Apple’s built in Spotlight will immediately recognize Inquisitor. In fact, Inquisitor’s tagline is: Spotlight for the web.

inquisitor.png

As you can see, with it installed, you simply start typing in Safari’s search bar and Inquisitor will give you results, suggestions, and autocomplete, all in a beautiful interface.

That’s useful and great, but what I love about Inquisitor is that it extends Safari’s search capability by letting you search not only Google (which is standard in Safari), but pretty much any site that has search capability. Let me show you what I mean. Let’s say I wanted to search for Time Capsule (because I’m getting mine today).

With Safari by itself, I would type it into the search box and press return for my results. But with Inquisitor, not only does it autocomplete as I type, it also begins to list search results automatically for me. And if that wasn’t enough, it lets me search Google, Wikipedia, Google Blog Search, and anything else that I have it set to search – just with the click of a button!

This is a great little feature and I use it all the time. And adding a new place to search couldn’t be easier:

  • Go into Safari’s preferences, and click on Inquisitor
  • Check the “Display Additional Search Engines” box and click “Edit Sites”
  • In the window that opens, either choose from on of the many sites built in, or choose “New custom search shortcut” from the little + arrow in the bottom left corner.
  • If you’re adding a custom one, all you have to do is replace the query with %@.

I have listed some examples below from the ones I use:

  • Wikipedia: http://en.wikipedia.org/wiki/Special:Search?search=%@
  • Hype Machine: http://hypem.com/search/%@/1/
  • Gmail: http://mail.google.com/mail/#search/%@
  • Last.fm: http://www.last.fm/music/?q=%@
  • Google Blog Search: http://google.com/blogsearch?hl=en&q=%@

I bolded the %@ for emphasis so you know how to the setup works. Its a very useful feature in a very useful little app. Oh, and its free, so go download it!
my writing

my website is a collection of my work and writing since 2004, so please don't be surprised if things seem a little outdated, particularly in the technology section. That said, the concepts behind most posts should be interesting given all that's happened since they were written so enjoy!